Setup screen M1
OPTIONAL
- The features in this topic will not be needed or only infrequently.

Press the SETUP button (B) on the home screen
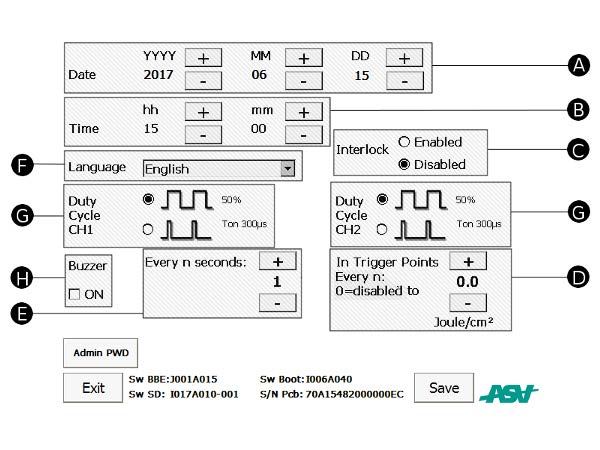
- A – Date adjustment
- B – Clock adjustment
- C – Interlock enabling
- D – Optional audible warning in Trigger Points mode upon reaching energy dose
- E – Audible warning every N seconds of treatment
- F – Language setting
- G – Duty/cycle setting
- H – General audible alarm enabling
Make sure that the Interlock (C) is set to Disabled
The Setup screen allows for the adjustment and setting of certain device functions.
Clock
The system clock (hours and minutes) can be set by means of the “+” and “–” buttons.
Date
The system date (year, month, day) can be set by means of the “+” and “–” buttons.
Interface language
The language setting can be chosen from those available from the drop-down menu.
Interlock
The interlock alarm function can be enabled or disabled. A small interlock plug is supplied with the unit. When connected it can be used to prevent the laser operating when the door to the treatment room is open for example. Another use is to activate a sign or light external to the room to notify that the laser is in use.
** Make sure that the Interlock is set to Disabled **
Duty Cycle
Each channel can be set independently to function with an MLS® emission with Duty-cycle fixed at 50% or variable.
Audible warning
The device’s audible warnings and signals can be enabled or disabled except for the laser emission warning signal.
Optional audible warning setting in Trigger Points mode
In Trigger Points mode, in addition to the audible warning that sounds as the time spent on the trigger point is completed, an additional audible warning can be enabled for sounding upon reaching the set energy dose (at steps of 0.5J/cm2).
Setting of emission warning audible alarm
Emission audible warning signal cannot be disabled, but can be set to emit sound every 1,2,3,4 or 5 seconds.
After making any changes in this screen, confirm by pressing SAVE.
To exit the screen without making changes, press EXIT.